2. Data Stewardship
Data Stewardship ensures high-quality, accurate, and reliable data across an organization. Data Stewards manage data assets, resolve discrepancies, and ensure correct data matching. The process involves evaluating and confirming potential matches, resolving low-confidence records, addressing unmatched data, and verifying final matched records before processing. Navigate to Data Stewardship from the left-side menu.
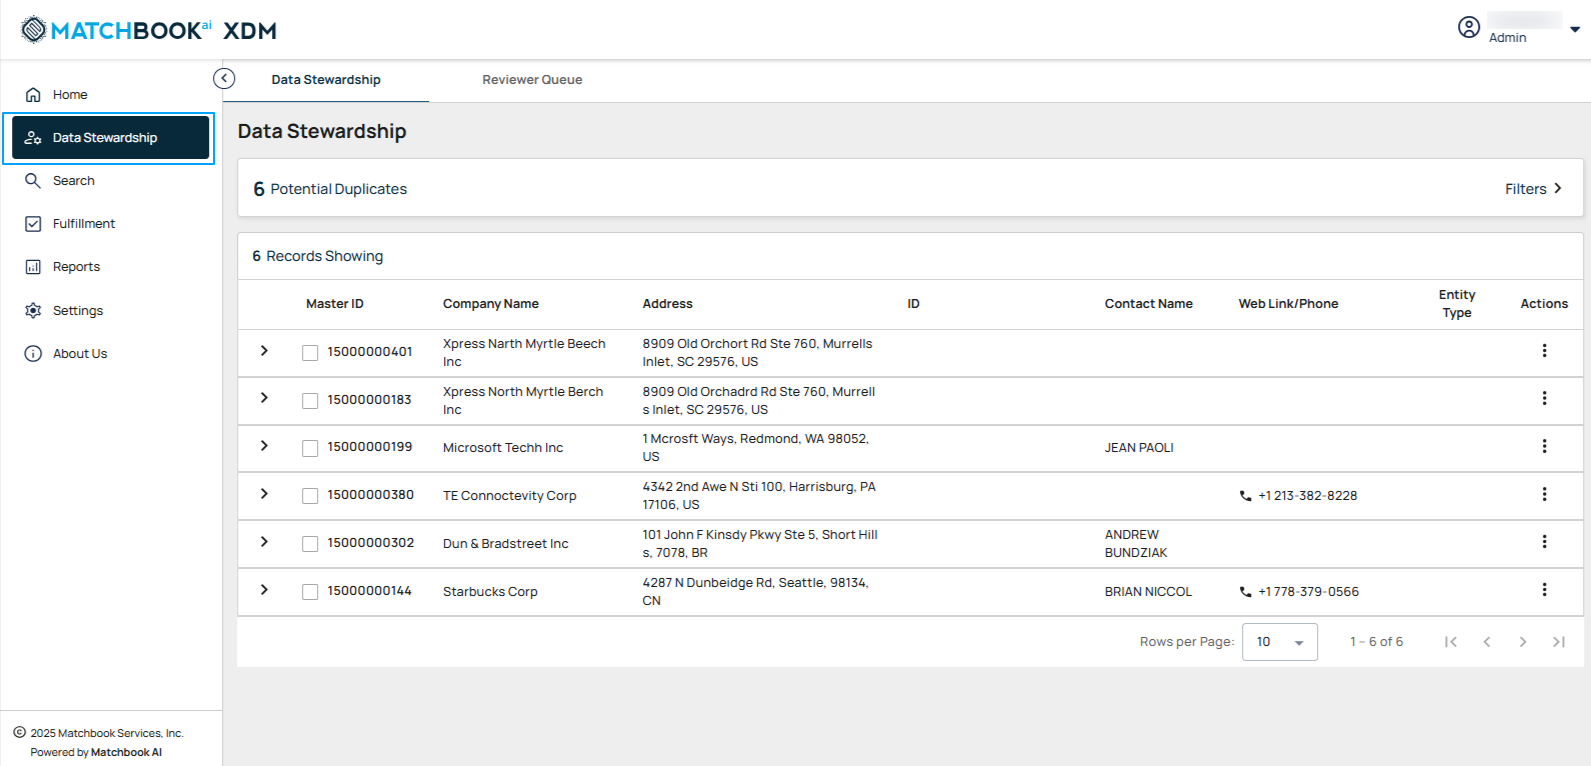
Once you click on Data Stewardship, the screen will display two tabs: Data Stewardship and Reviewer Queue. Click on a tab to switch between the Data Stewardship and Reviewer Queue sections.
2.1 Data Stewardship
Data Stewardship helps maintain data accuracy by identifying and resolving potential duplicate records. When you select the Data Stewardship module, you’ll see key metrics including total records, mastered records, and potential duplicate records for easy and effective monitoring.
Potential Duplicates
Records that are likely duplicates based on matching logic and need validation.
Note
Potential duplicates are sorted by match rank instead of match score, making it easier for users to prioritize and review high-quality matches more consistently.
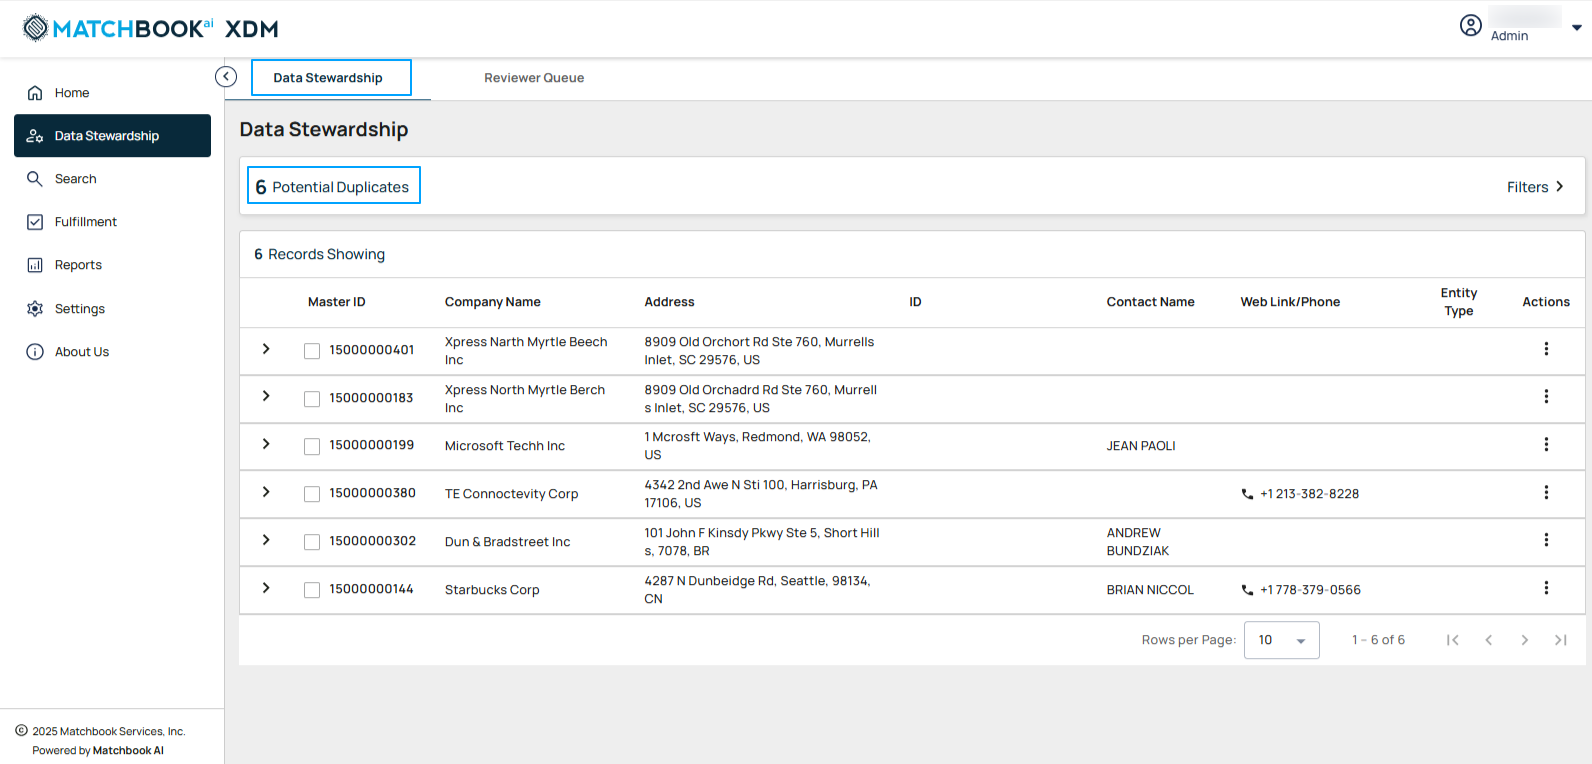
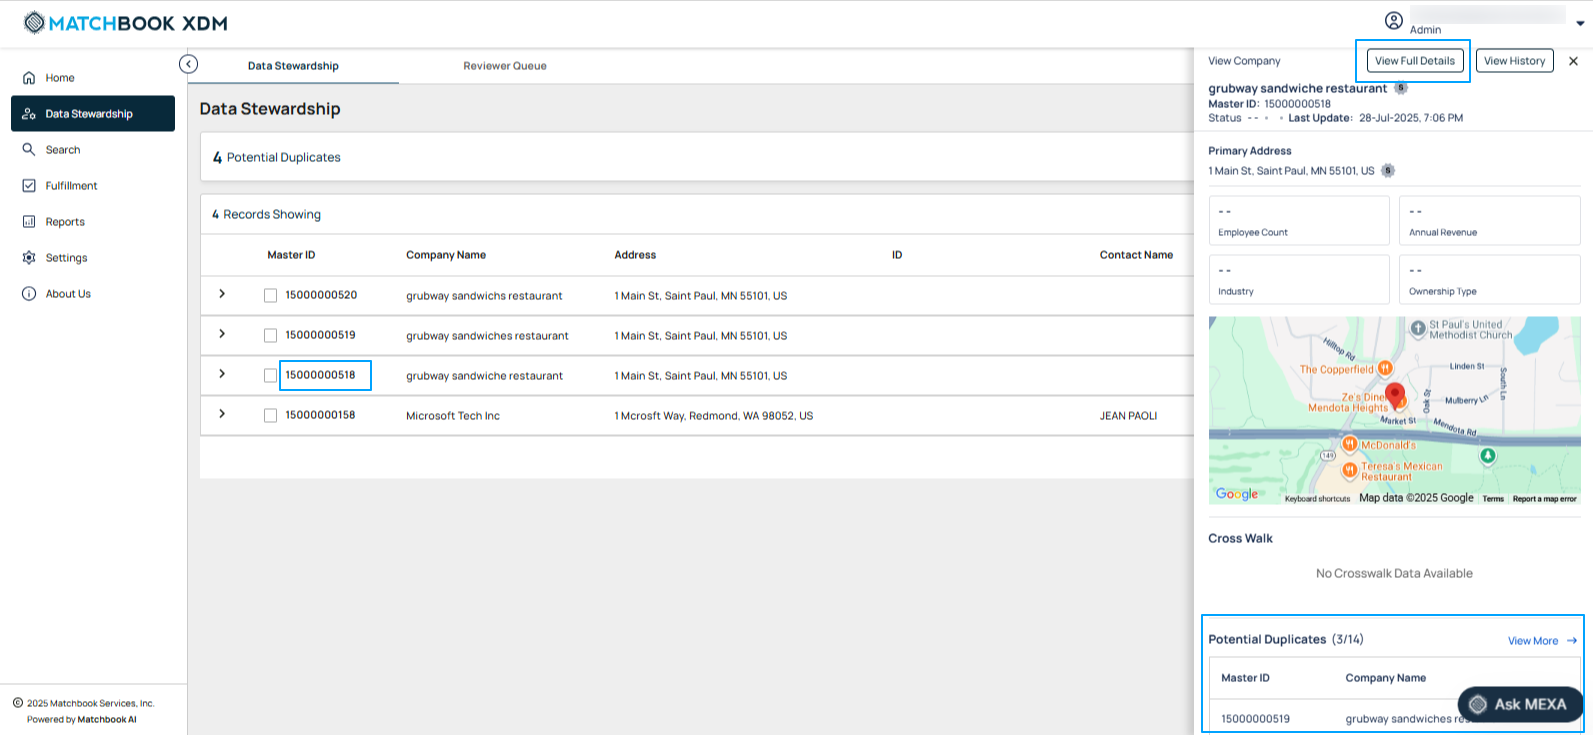
Click on any Master ID (as shown in the screen below) to open the Compact View of the entity. From here, Data stewards can view Potential Duplicate records for unique entities. To see more information, click on View Full Details to open the Company Details page.
In the Company Details page, users can now view Potential Duplicate records for unique entities. This feature helps Data Stewards quickly identify and take action on similar records that may require merging.
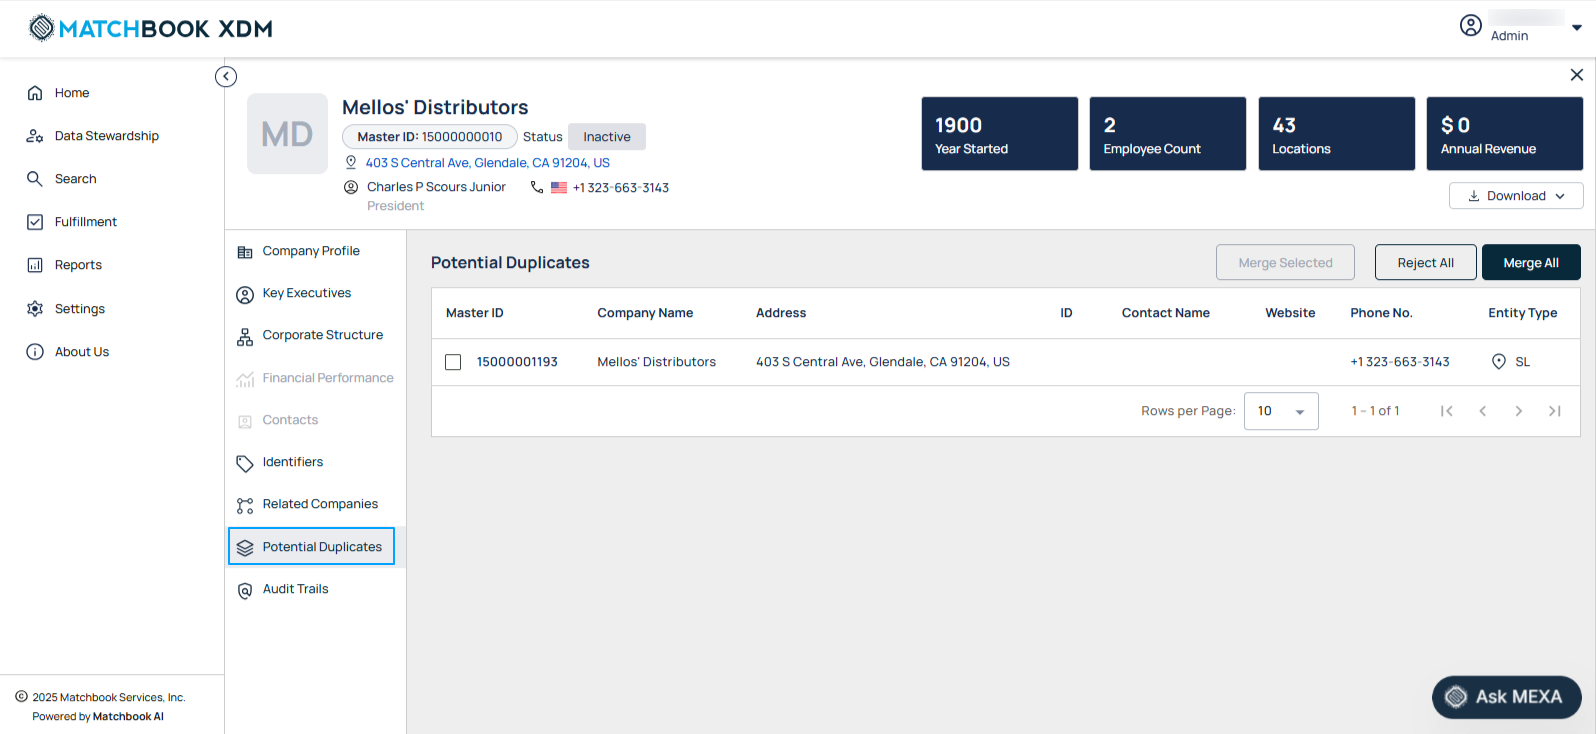
Users can select one or more potential duplicates using checkboxes and take stewardship actions directly within this view:
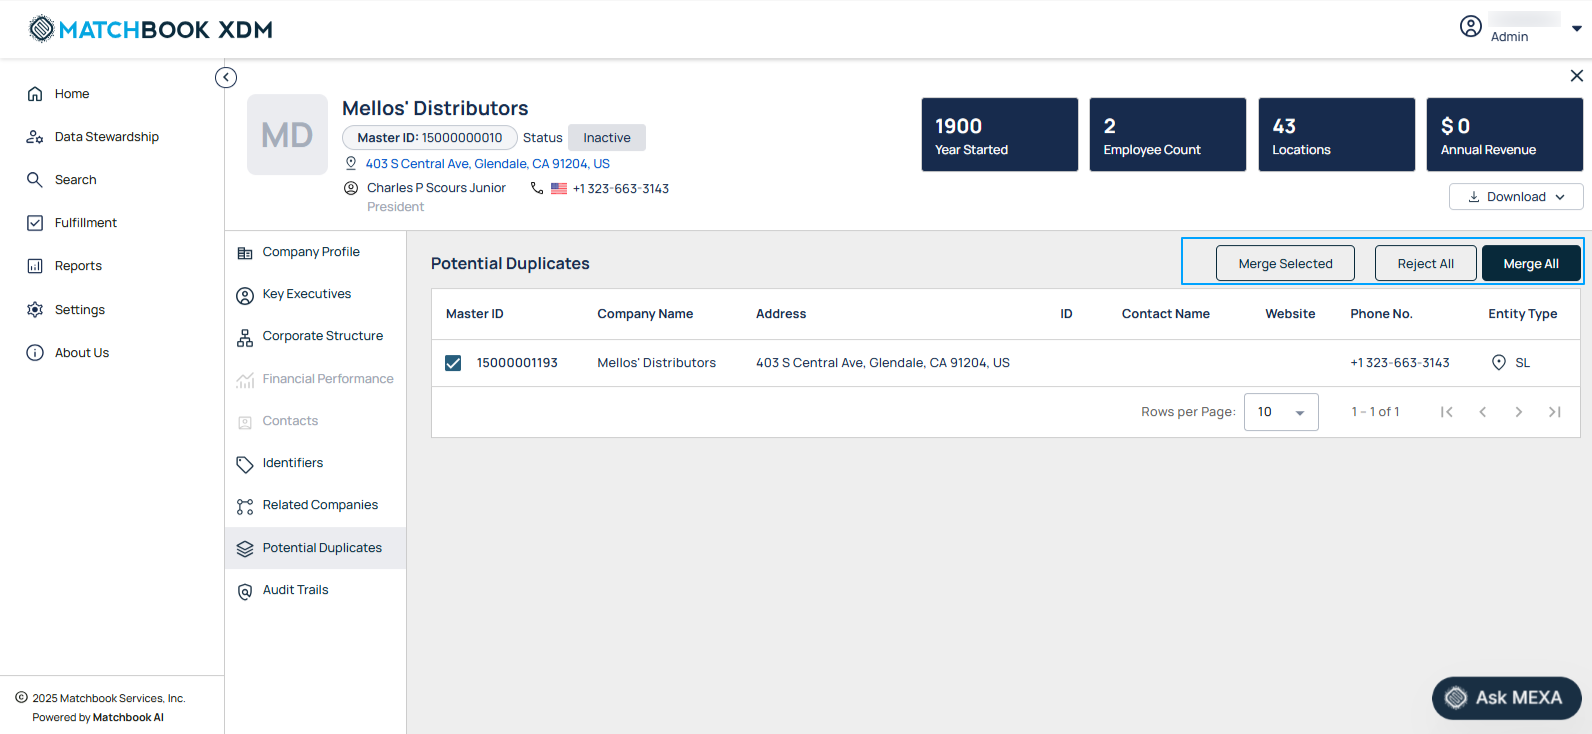
The Merge All, Merge Selected and Reject All options allow users to take bulk actions on matched records- merging or rejecting them based on the selection criteria.
Merge All: Merge All is available for Node Records in the Actions column. Selecting this option merges all unique individual records into the Node Record cluster. This option is only enabled at the Node Record level and is not available for individual unique records.
Merge Selected: To merge specific records with the node record, select the desired records and click the Merge Selected button. Once merged, the Potential Duplicates section will update accordingly.
Reject All: Reject All is available only for Node Records in the Actions column. Selecting this option removes the entire Node Record along with all its associated unique individual records. Once rejected, the Node Record and its unique records are eliminated from the current cluster. Users cannot reject individual unique records separately.
Merging a record does not immediately remove it from the list; the table remains unchanged and actions disabled until the process is complete.
Once the merge completes:
The merged records are removed.
Remaining records are automatically rejected.
The section switches from Potential Duplicates to Included Companies.
If no potential duplicates are found, a message is shown: “This record does not currently match any known entities based on the available data.”
Note
If another user is already working on the same parent record, a lock icon is displayed with a tooltip: “This record is locked by another user.”
Actions such as Merge and Reject will be disabled for the second user.
If two users act on the same child record in different sessions, the first action is processed, and the second user sees: “Merge/unmerge is already in process for this entity. Please check the Review Queue for more details.”
Filters
To refine data using filters, click on Filters. Clicking the Filters button expands the filter panel, allowing users to search and filter records based on specific fields.
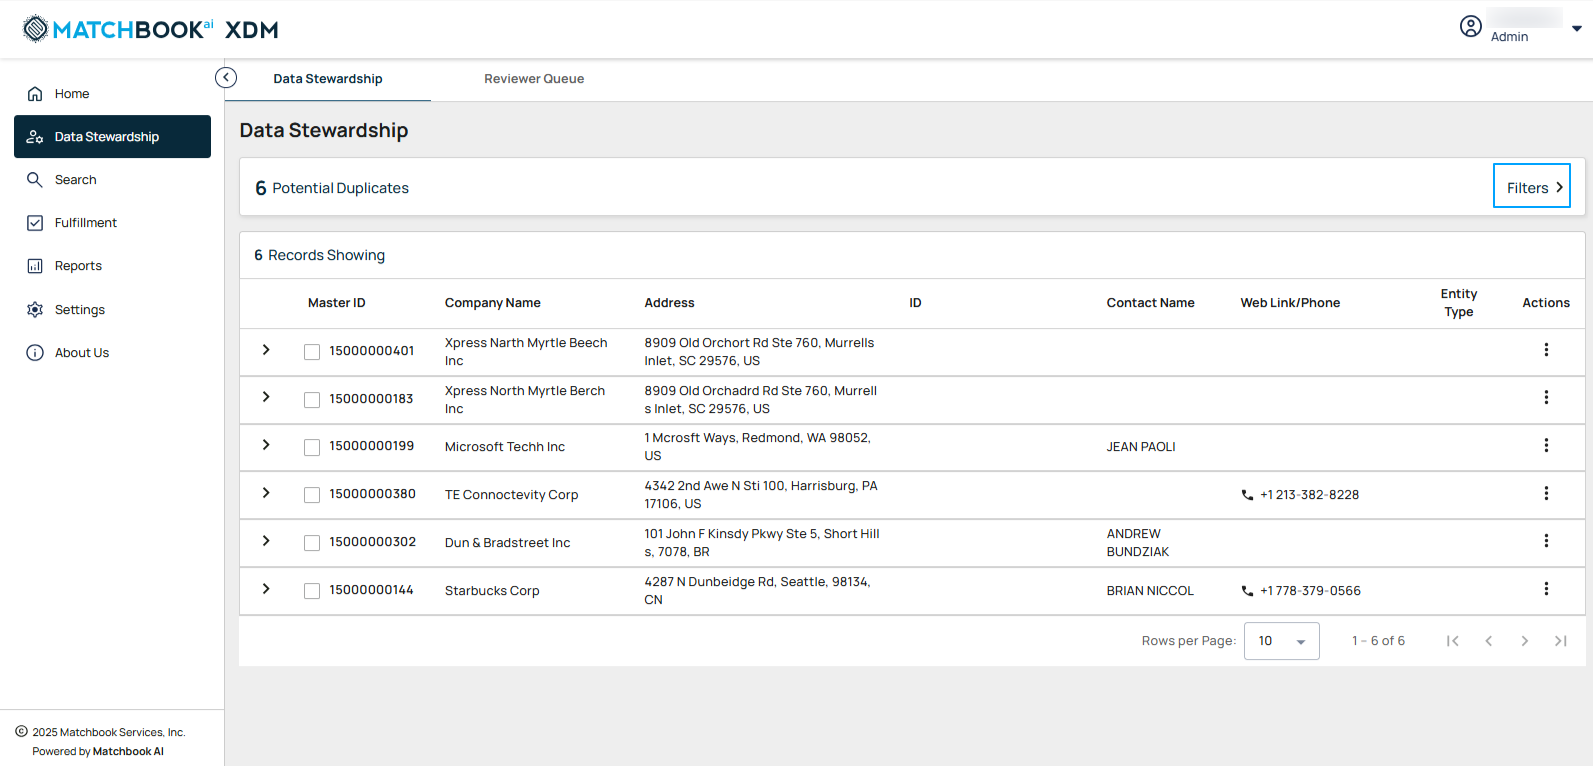
To narrow your search, enter the desired company name in the field provided, and if needed, provide values in other fields for more precise filtering. Then, click Apply Filter.
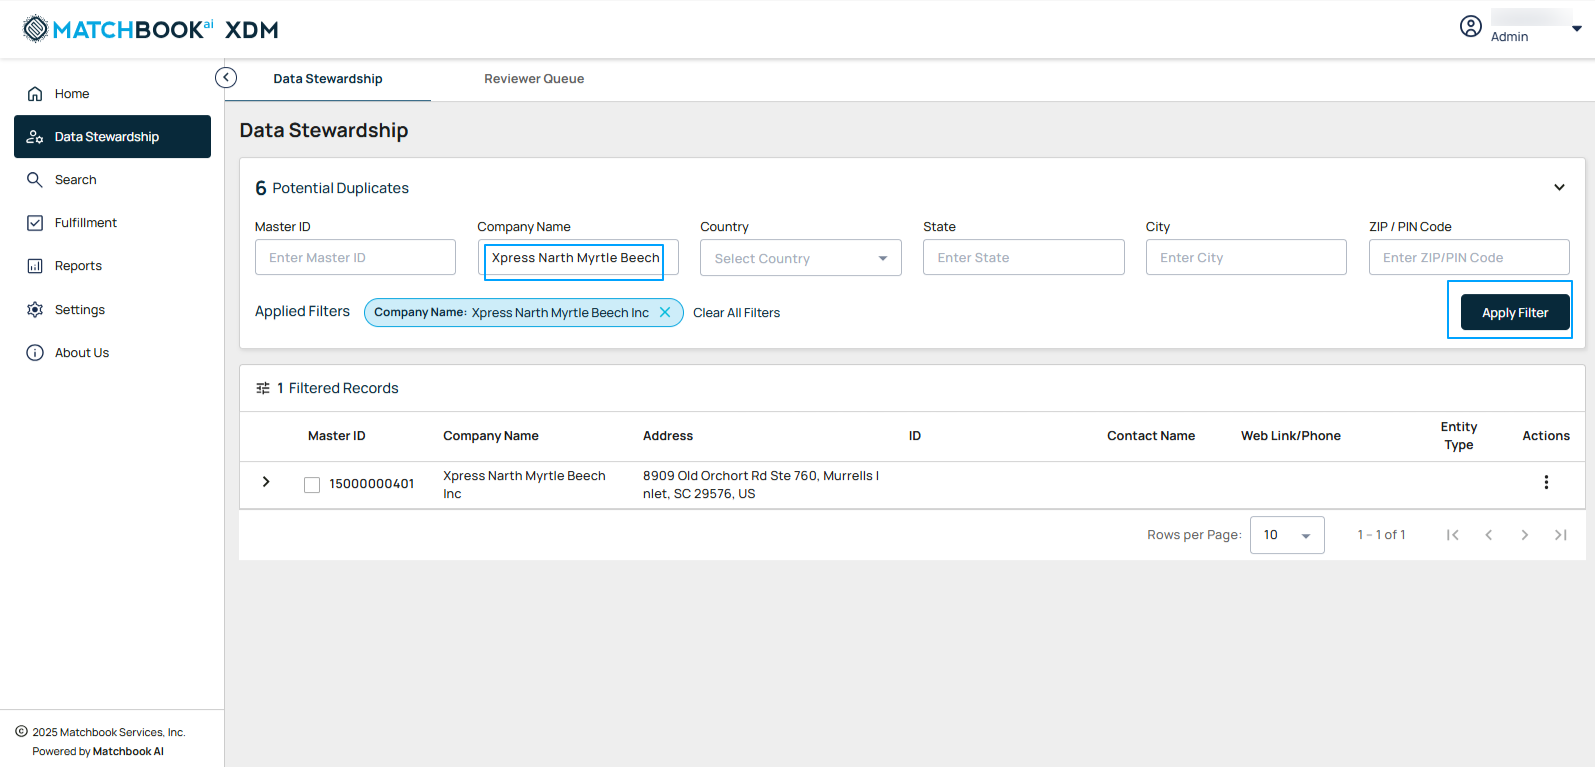
Note
Users can select Country and State from predefined dropdowns to ensure consistent and standardized address entry. The State field dynamically responds to the selected Country, showing only relevant options from imported data.
The system displays Filtered Records above the search results, indicating the total number of records found (e.g., 1 Filtered Record).
If any records match the applied filters, the results will be displayed and the data will appear in a structured format, allowing you to review the relevant records easily.
Field |
Description |
|---|---|
Master ID |
A unique identifier assigned to each record. |
Company Name |
The official name of the organization. |
Address |
The physical location or mailing address of the company. |
ID |
The original or source system identifier for the entity. |
Contact Name |
The full name of the associated individual or point of contact. |
Web Link/Phone |
The primary contact number for the company or individual. |
Entity Type |
Displays business classification along with an entity type symbol:
|
Actions |
Available options for managing the record:
|
Note
Master ID and ZIP/PIN Code should contain only numerical values.
Pagination will initially display the first 10 records. Users can choose the number of records that are to be displayed on one page. Users can click the “>” button to view the next 10 records or the “<” button to navigate back to the previous 10 records. The system displays pagination controls when the number of results exceeds the visible limit, allowing users to navigate between pages and choose the number of records displayed per page.
Hover over column headers (Master ID, Company Name, Address, ID, Contact Name, Web Link/Phone, Entity Type) to sort data in ascending or descending order. Sorting icons indicate the current sort order.
There is one ID available in the ID column. Users can search for records using this ID. For example: NID (National ID).
When the results are displayed on the screen, each row will have an “>” symbol (that is expand icon). Clicking the “>” expand icon will expand the row, allowing users to view the Node Record along with all unique individual records associated with it. When the Node Record is expanded, users can see multiple companies, addresses, and IDs grouped under the record. Record details are grouped and displayed to the user based on the Rank Order.
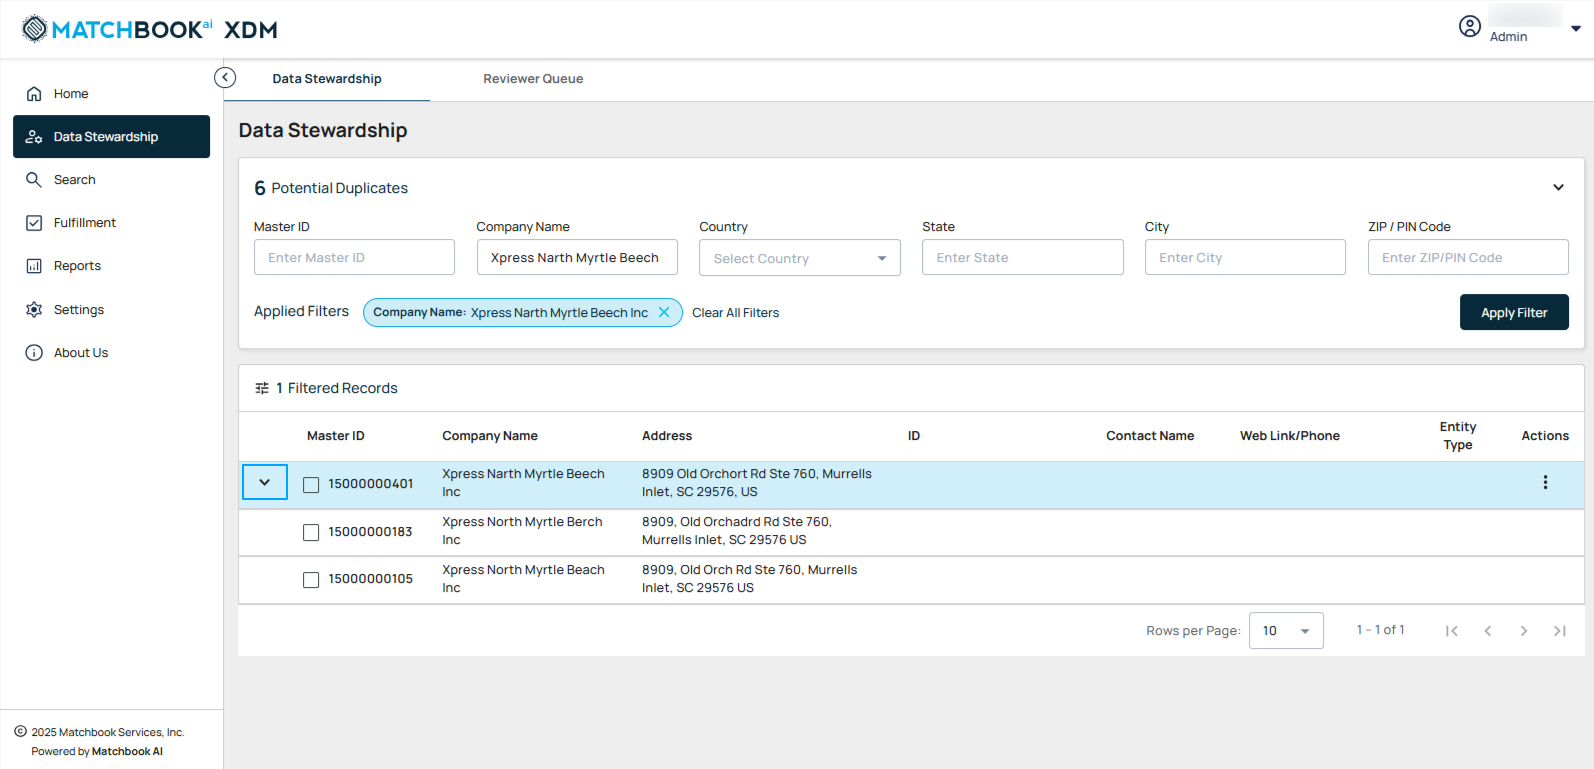
As shown in the screen below, when you click on the three-dot menu for a row, under Actions column you will see three options: Merge All, Merge Selected and Reject All.
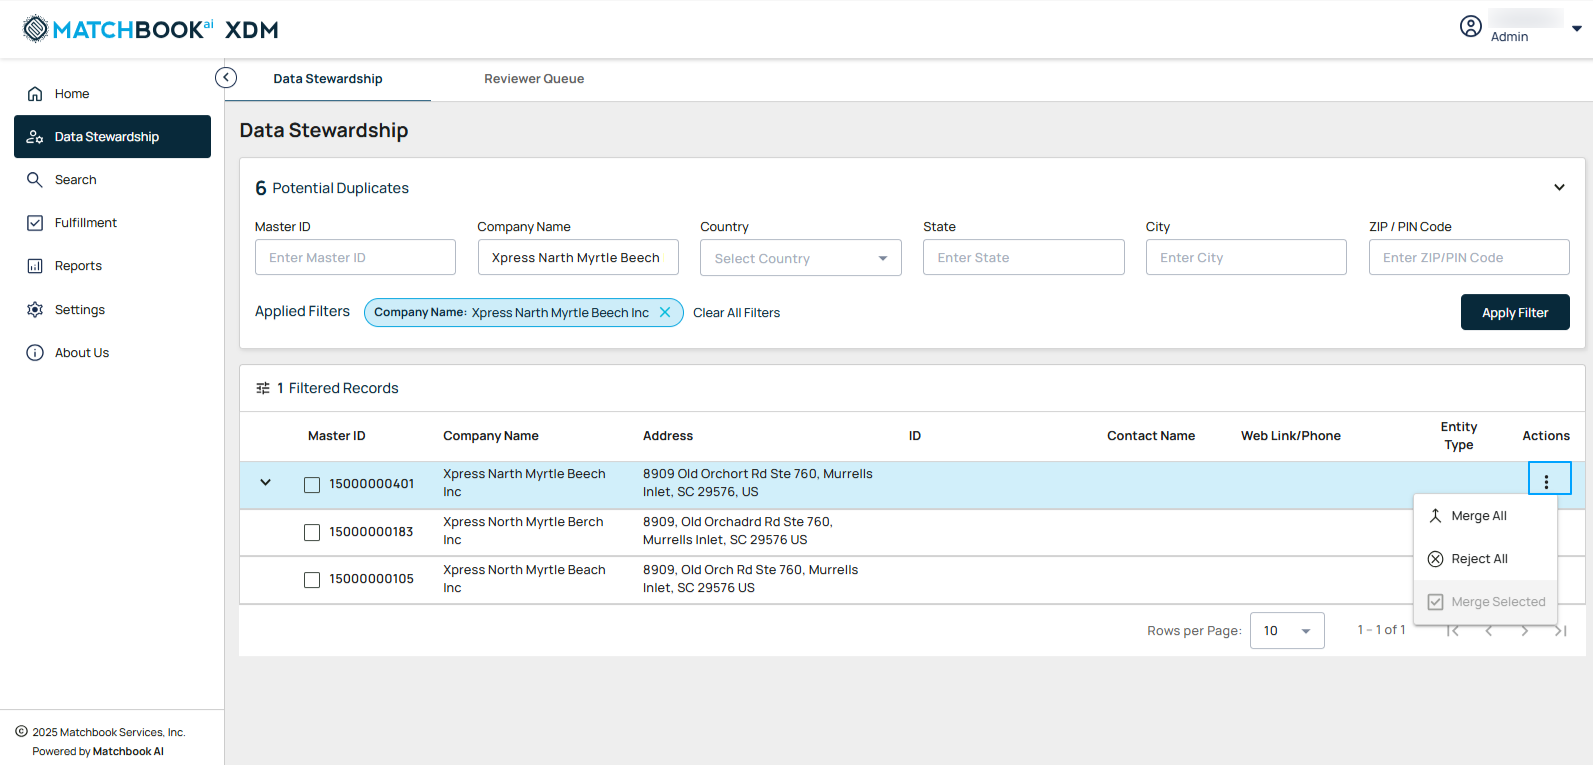
Merge All: Combines all identified duplicate records into a single record.
Reject All: Dismisses all suggested potential duplicates, keeping the records separate.
Merge Selected: Allows you to manually choose specific records to merge while leaving others unchanged.
Merge All
Merge All is available for Node Records in the Actions column. Selecting this option merges all unique individual records into the Node Record cluster. This option is only enabled at the Node Record level and is not available for individual unique records.
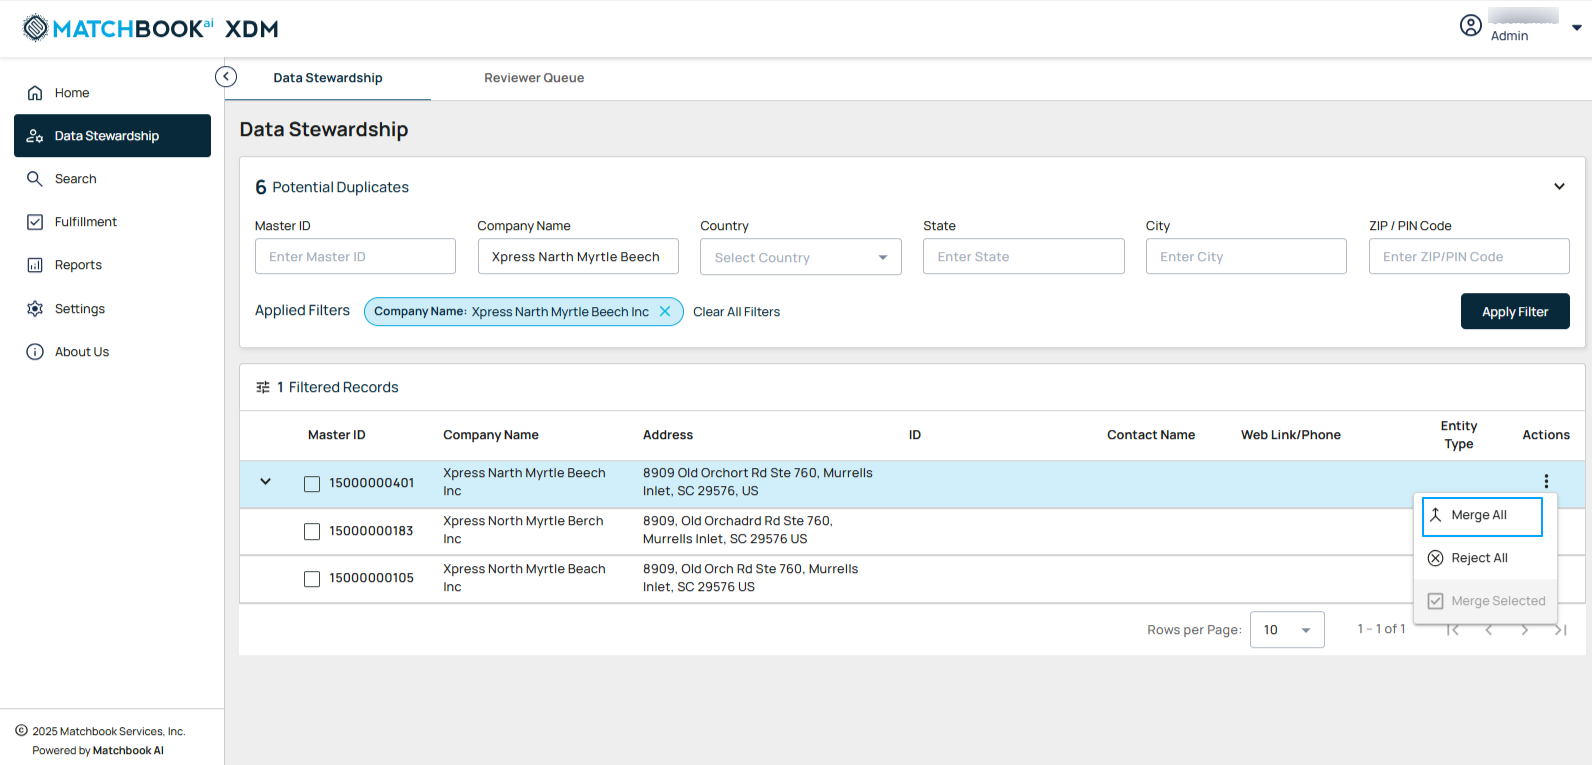
When you click on the Merge All option, a confirmation pop-up window titled “Merge All Records” will appear. It contains the message: “Are you sure you want to merge all related records?”
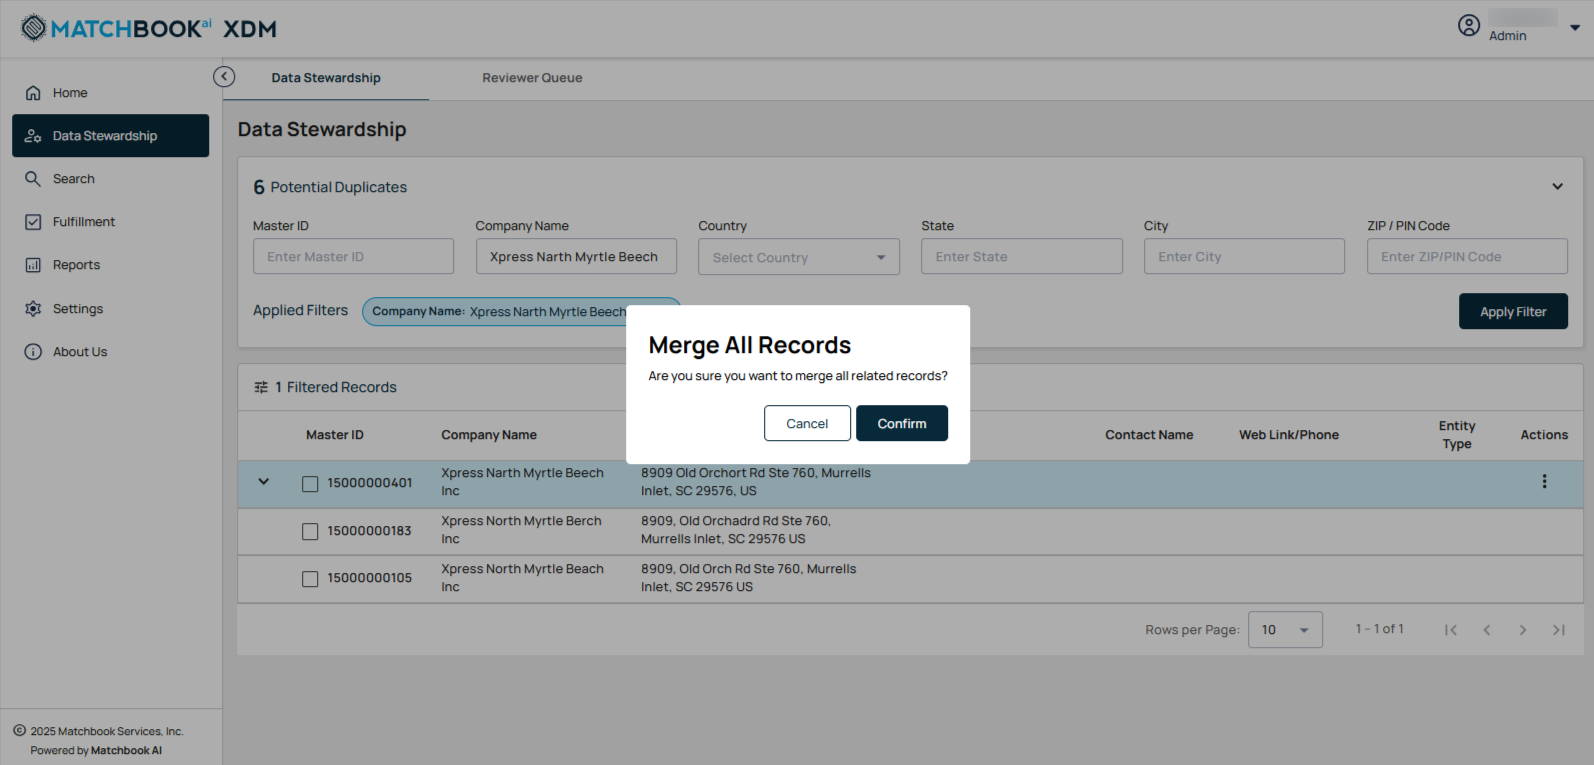
Selecting Cancel will close the pop-up without making any changes (that is without merging).
Clicking Confirm merges the selected records into the Node Record. The merged records are removed and the Potential Duplicates metric is updated accordingly. A message will appear at the top stating, “All records have been submitted for merge and added to the Reviewer Queue for processing.”
Merge Selected
Merge Selected is enabled when the user selects one or more unique individual records within a Node Record. The selected records will be merged into the Node Record cluster, while unselected records will remain in the cluster. If the selected records are not merged with the Node Record, they will form a new cluster, and the remaining records will stay under the original Node Record. This option is only available at the Node Record level and cannot be used for individual unique records alone.
To proceed, check the boxes next to the records you want to merge.
After selecting the records you want to merge, click on the three-dot menu for a row and select Merge Selected.
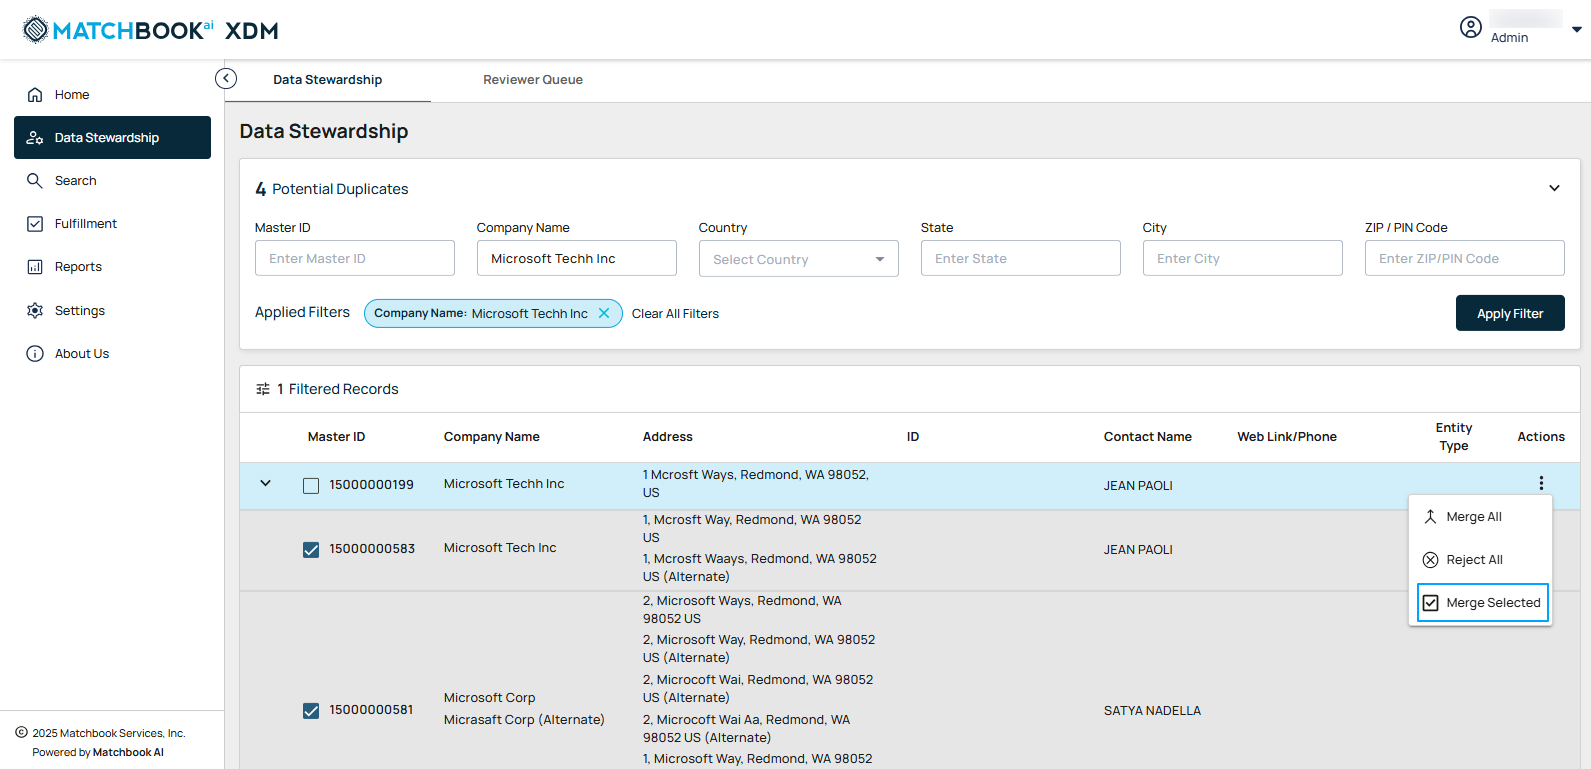
A confirmation message will appear, prompting you to confirm or cancel the merge process.
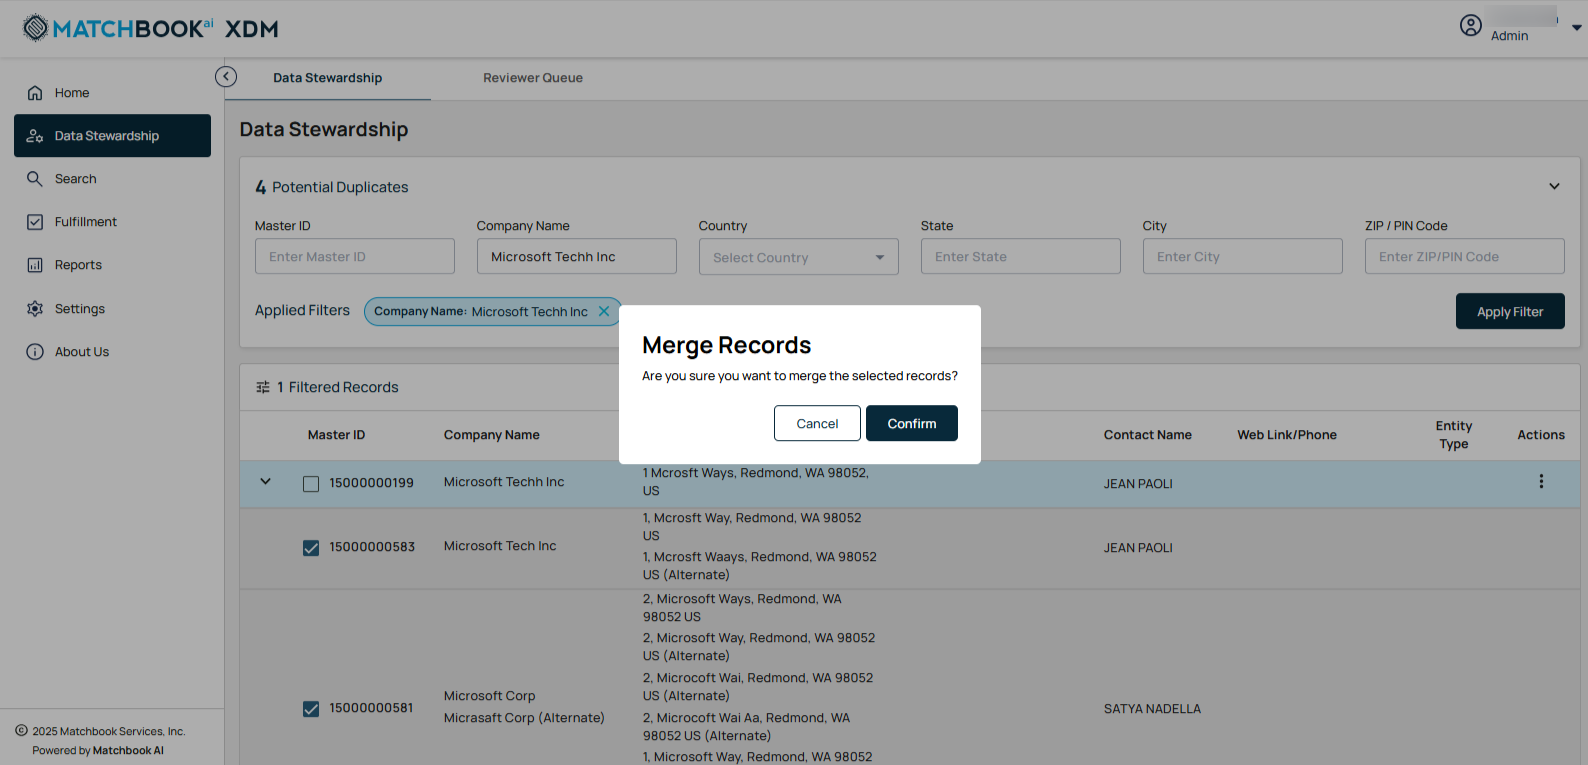
If you click on Cancel, no changes will be made.
If you click on Confirm, only the selected records will be merged, and a message will appear stating that “Selected records have been submitted for merge and added to the Reviewer Queue for processing”.
Reject All
Reject All is available only for Node Records in the Actions column. Selecting this option removes the entire Node Record along with all its associated unique individual records. Once rejected, the Node Record and its unique records are eliminated from the current cluster. Users cannot reject individual unique records separately.
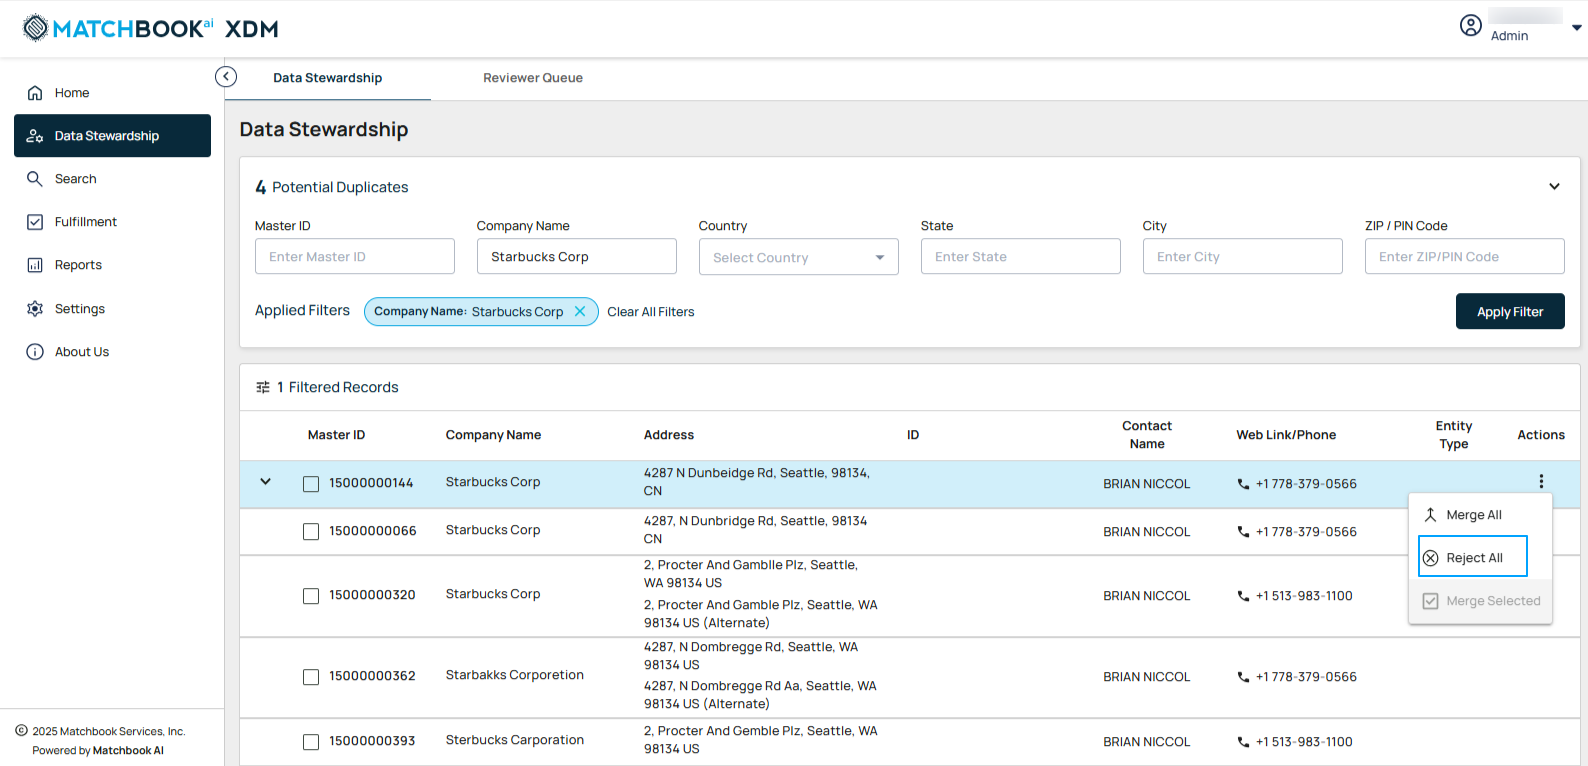
A confirmation message will appear, prompting you to confirm or cancel the reject process.
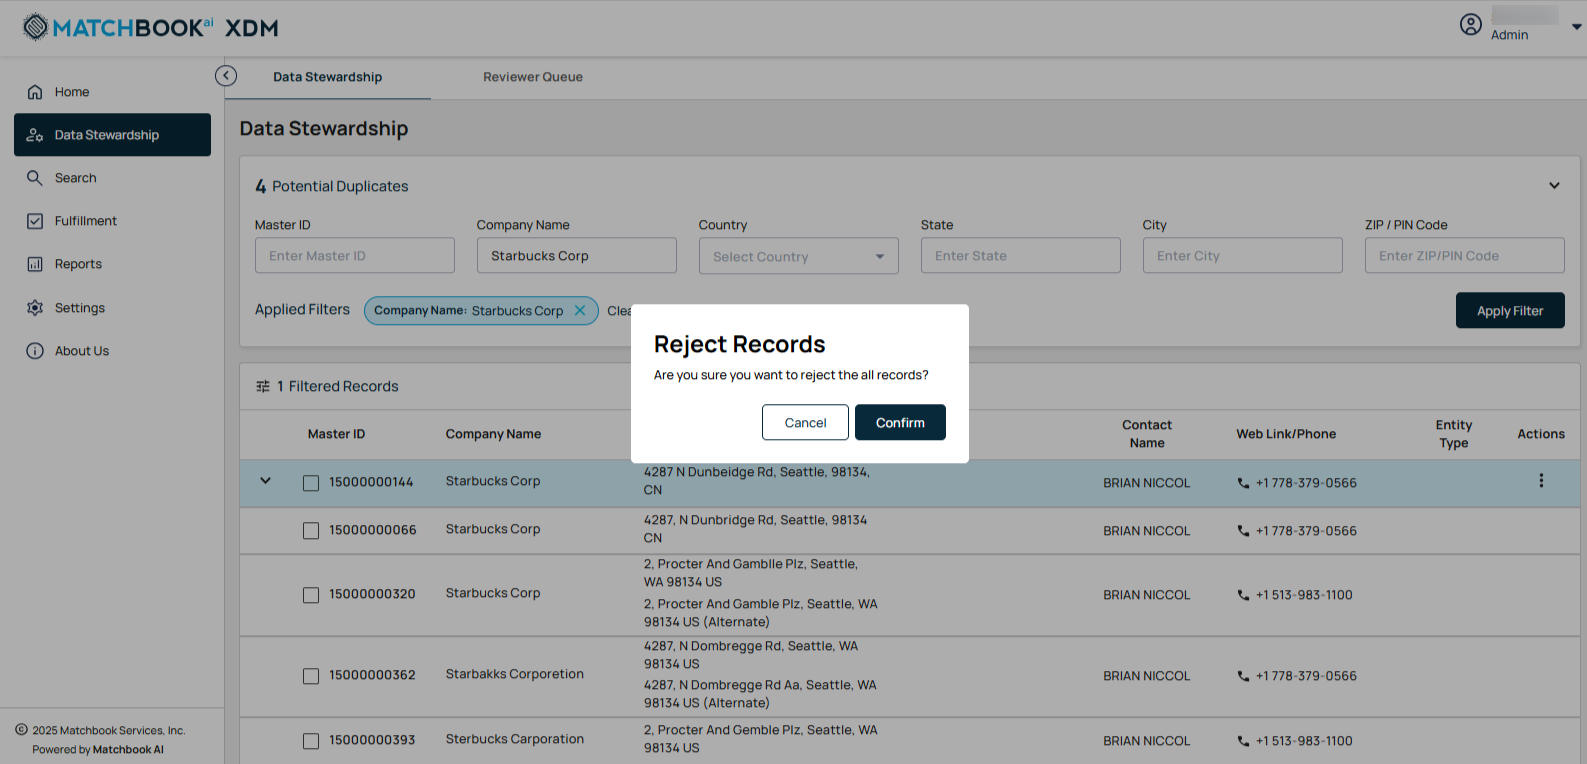
If you click on Cancel, no changes will be made.
Clicking on Confirm, removes the selected records from the Potential Duplicates list and a confirmation message will appear stating that “All records have been rejected and removed from data stewardship”.
2.2 Reviewer Queue
The Reviewer Queue is a monitoring interface within the Data Stewardship module that tracks and displays the progress of merge and unmerge actions performed on master data records.
When a user initiates a merge or un merge action, the corresponding records are automatically routed to the Reviewer Queue. This queue functions as a read-only interface, enabling data stewards to monitor and track the status of these actions without making additional changes during the processing stage.
Select the Reviewer tab to track ongoing processes and their statuses.
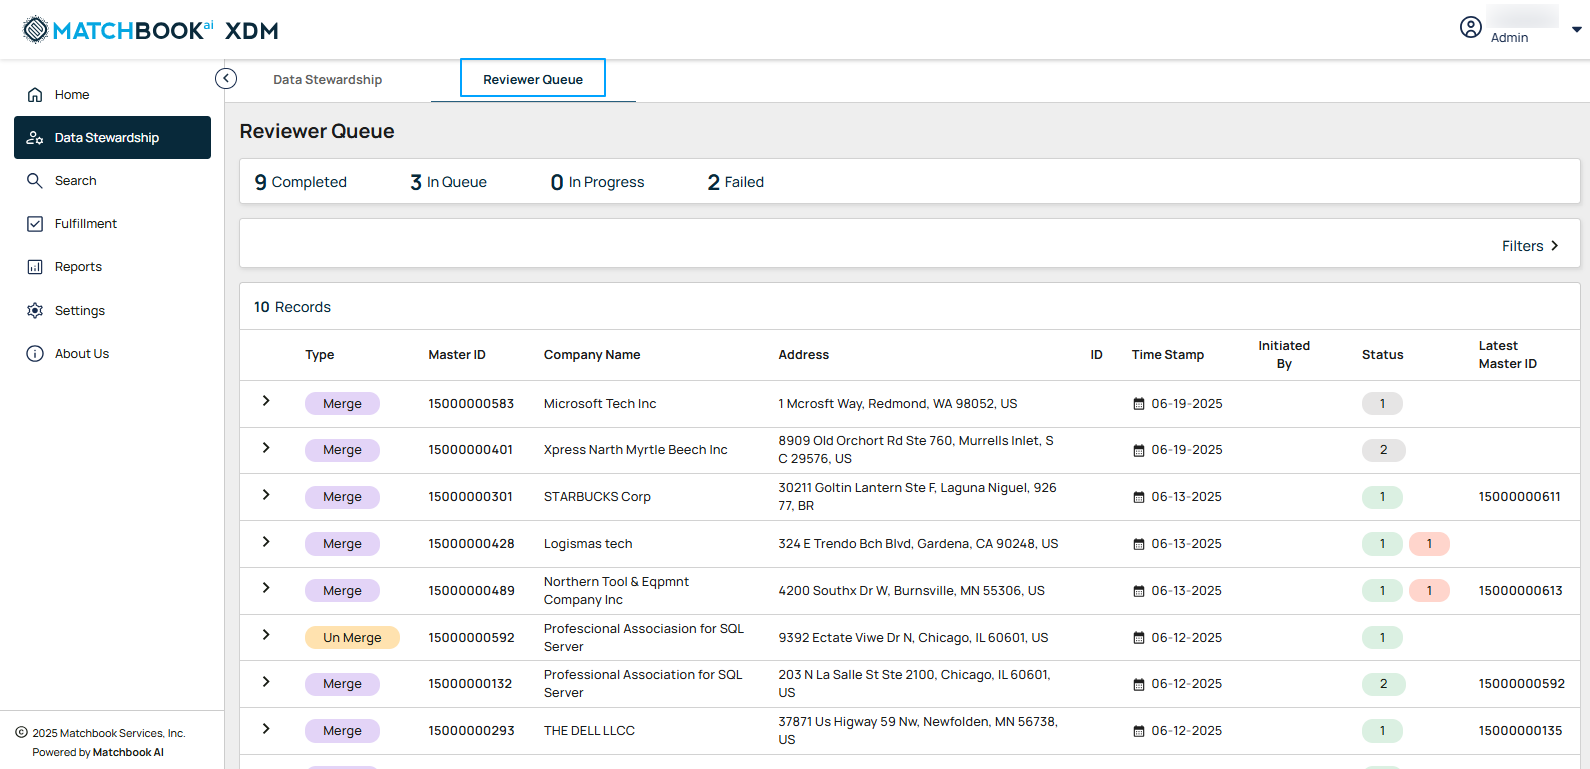
Reviewer Queue
This section displays the status of the records, that is the number of records that are in queue, completed, in progress, and failed (For example: 9 Completed, 3 In Queue, 0 in Progress, 2 Failed).
The description of each column is provided in the table below:
Column |
Description |
|---|---|
Type |
Indicates whether records were merged or unmerged. |
Master ID |
A unique identifier assigned to each record. |
Company Name |
Official business name of the company. |
Address |
Displays the primary address associated with the entity. |
ID |
Displays relevant business identifiers (e.g., NID). |
Time Stamp |
The date and time of the recorded action. |
Initiated By |
The user who performed the action. |
Status |
Shows the current processing stage of the record (In Queue, Completed, Failed, In Progress). Note: When the status is Failed, it means there is a conflict with the Source ID. |
Latest Master ID |
The most recent identifier assigned after processing. Note: The Latest Master ID is assigned only when the process is completed. |
Note
Users can click on column headers (Type, Master ID, Time Stamp, Initiated By) to sort data in ascending or descending order. Sorting icons indicate the current sort order.
All records displayed on the screen will be locked in other users when one user is viewing them. However, if the user leaves the Data Stewardship page or logs out, the records will be unlocked, making them accessible to other users.
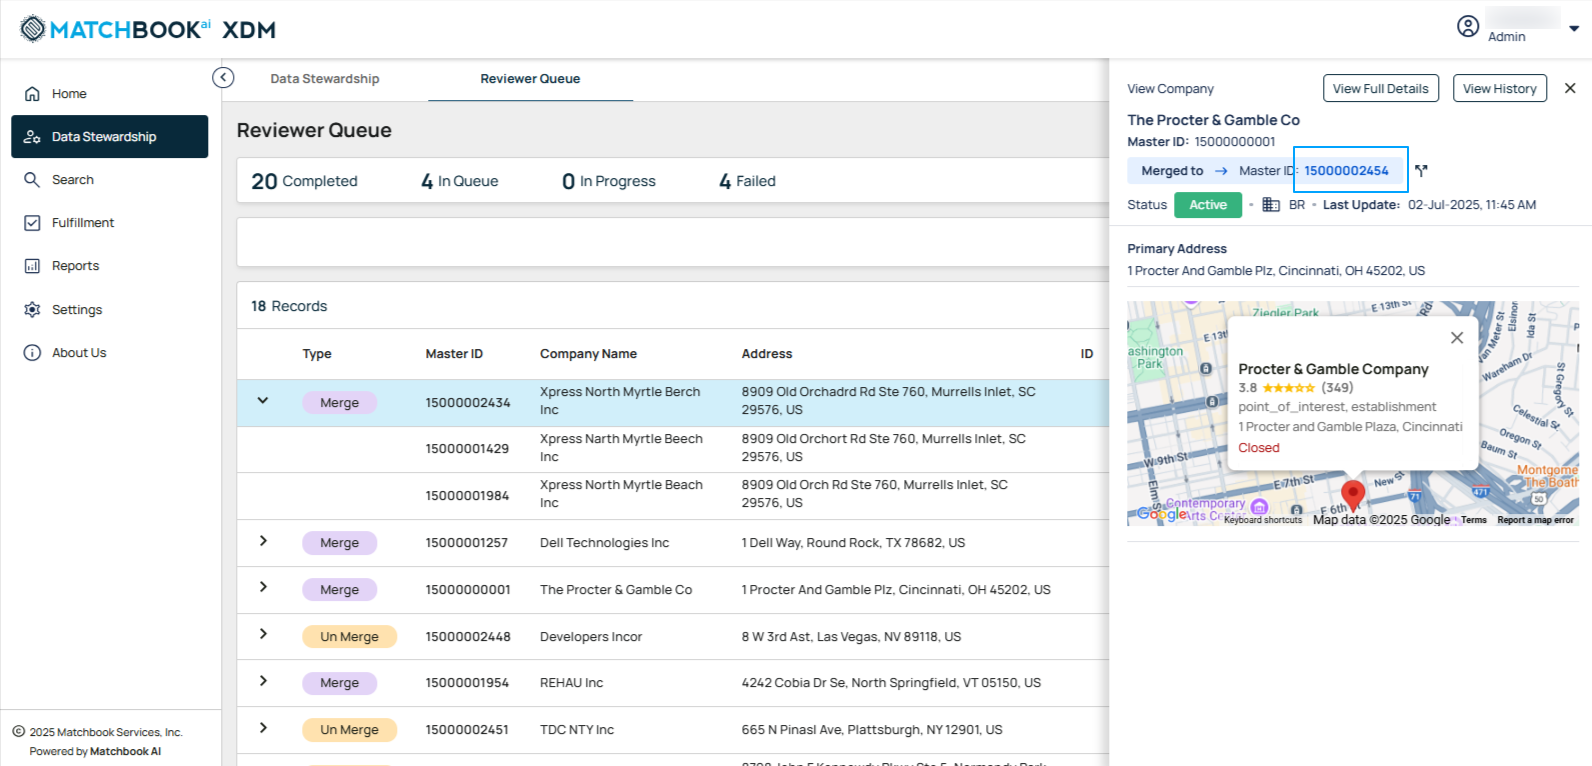
Click on the expand icon to the left of each row to view the records that are set to be merged or unmerged. Now, you will see the records matching the company name displayed.
In Compact View, users can view and navigate to the Master Record associated with a child (merged/included) record. This feature allows Data Stewards to easily understand record lineage and access the parent entity directly. If a record is part of a mastered cluster, a label “Merged to Master ID: XXXXXX” will be displayed, with the Master ID rendered as a clickable hyperlink. Clicking this link takes the user to the Master Record’s details within the same browser tab, maintaining context.
Unmerge
As a Data Steward, you can unmerge a child (included) record from its master (parent) record directly through the Compact View. This function is helpful when a merge was performed incorrectly or is no longer valid, allowing the record to be independently edited, re-evaluated, or processed. The Unmerge option is available only for records that are part of a mastered cluster and have a valid Master ID. Once confirmed, the unmerge request is submitted and tracked via the Reviewer Queue, and the system updates both child and parent records accordingly.
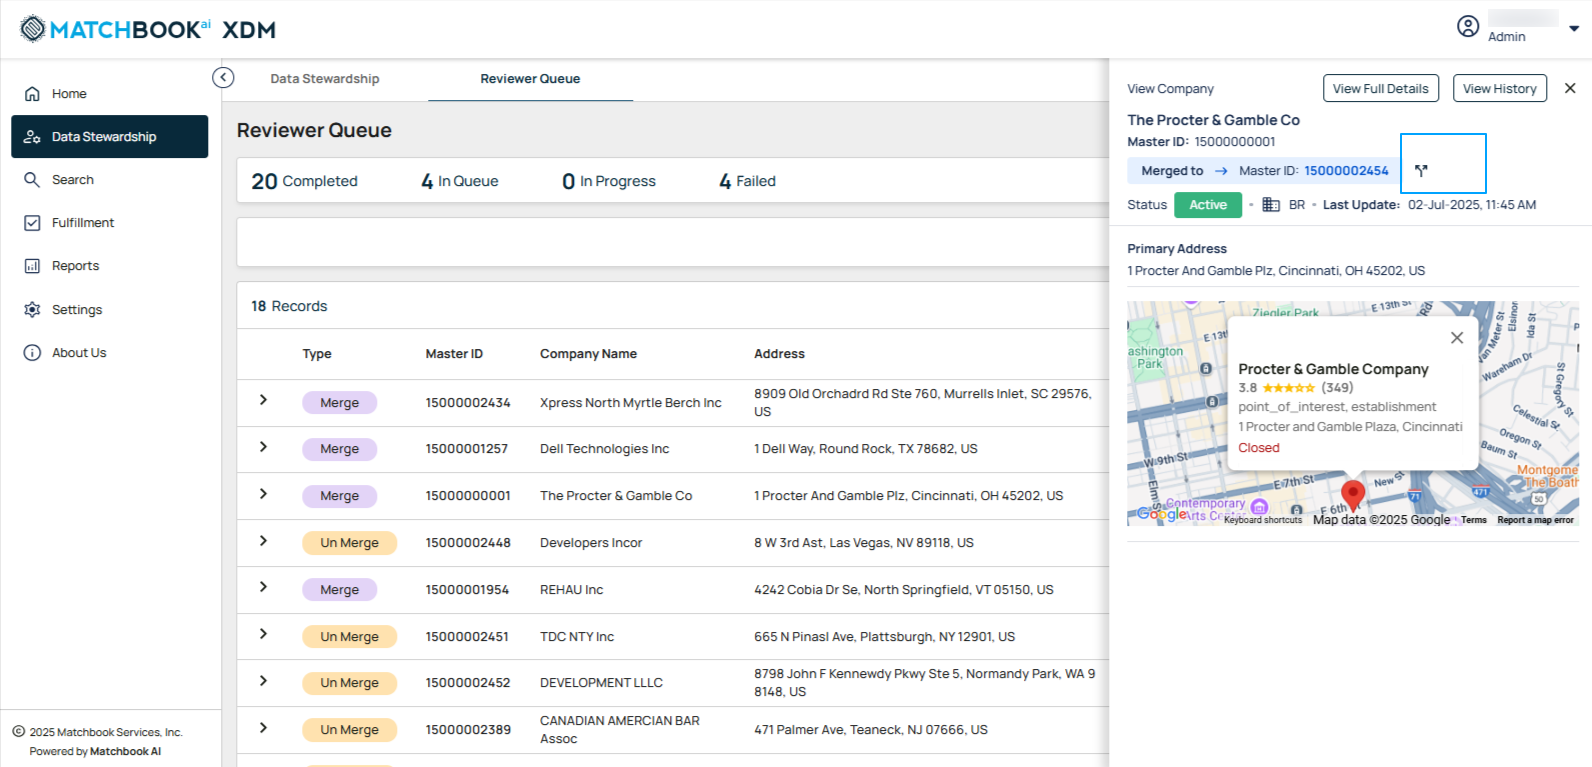
The Unmerge button is displayed only for child/included records.
A valid Master ID must be present.
If the parent record is locked, the Unmerge option is disabled.
Clicking Unmerge opens a pop-up window title Confirm Unmerge, saying
“You are about to unmerge this record from its master. Once confirmed, it will be removed from the master record and sent to the reviewer queue for validation and further processing.”
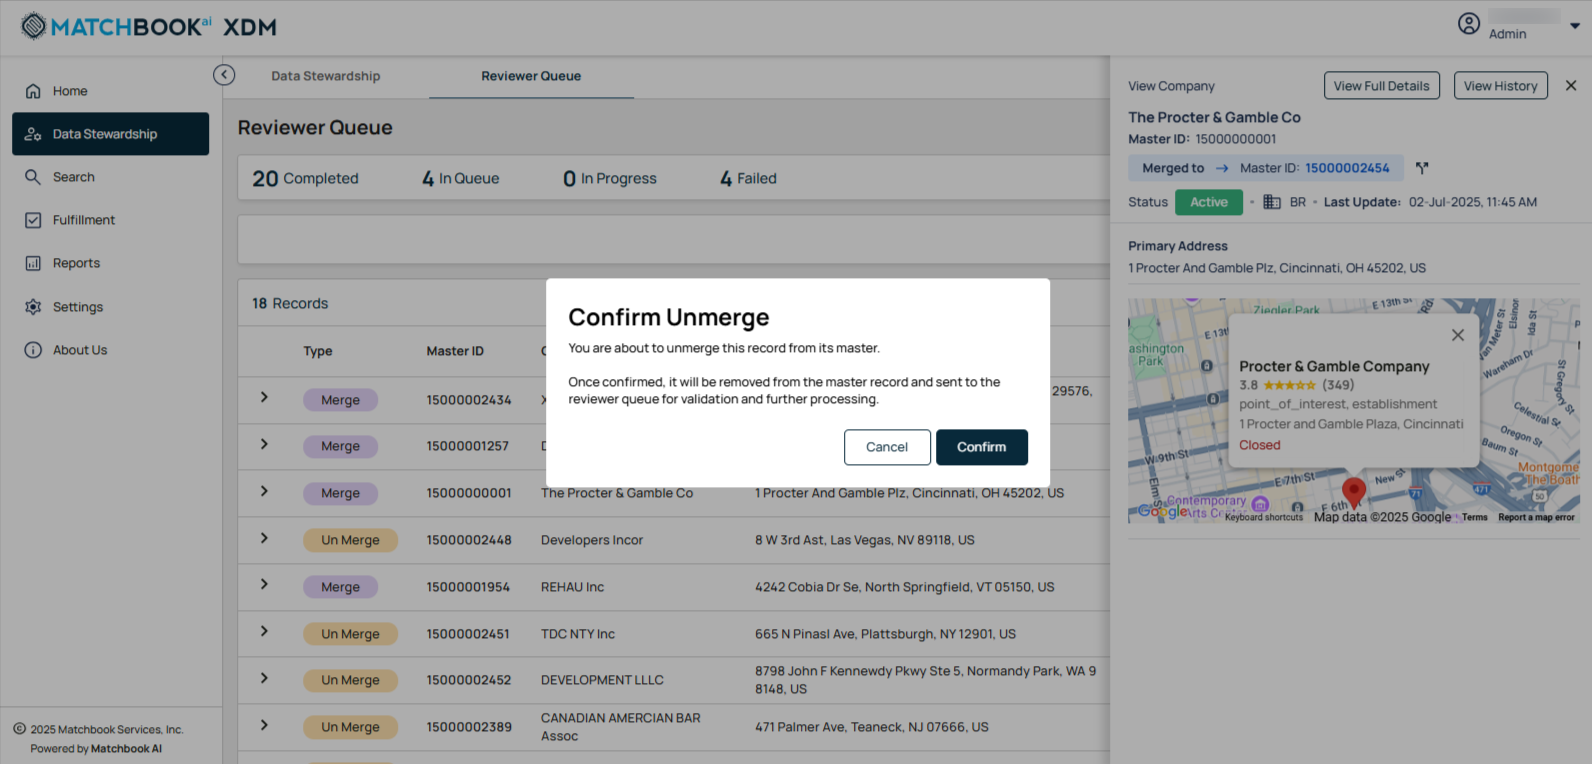
By clicking on Confirm button, the record is queued for unmerge and a toast message is shown: “The selected record has been queued for Unmerge”. The Unmerge button becomes disabled while the request is in queue.
After the unmerge is completed, the record is fully detached from its Master Record. The Master ID hyperlink and Unmerge button are removed from both the Compact View and the Company Details interface. The record is now eligible for re-clustering by the mastering engine, and the parent record is updated to reflect the removal. Additionally, the unmerge action is logged and becomes visible in the Reviewer Queue for audit and tracking purposes.
Viewing and navigating to the Master Record associated with a child (merged/included) record is also supported in the Company Details page.
Click on the View Full Details tab to take you to the Company Details page.
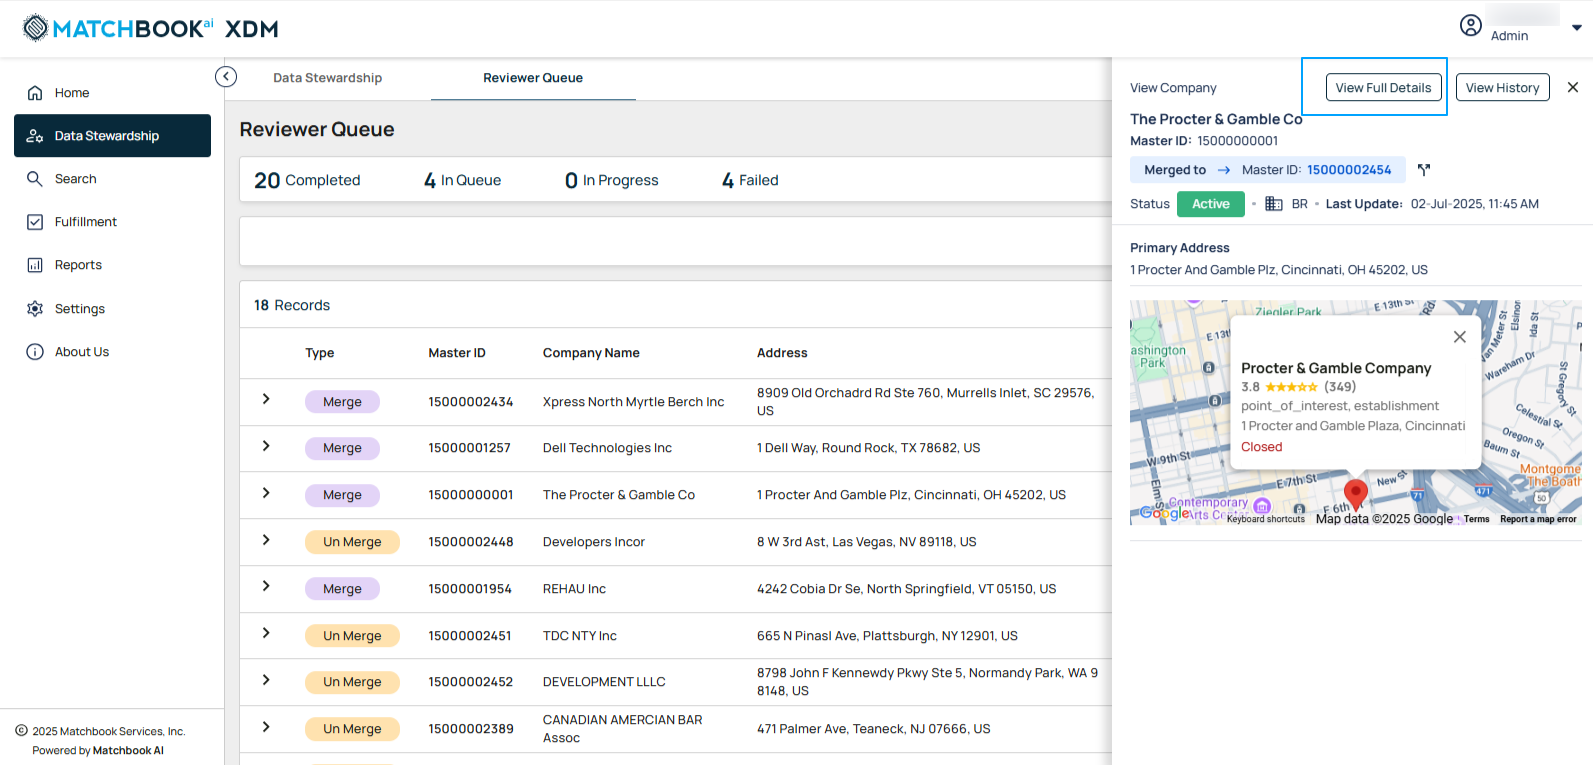
If the record is part of a mastered cluster, a label “Merged to Master ID: XXXXXX” will be displayed, with the Master ID shown as a clickable hyperlink. Clicking this link will navigate you to the Master Record’s details within the same browser tab, preserving your context.
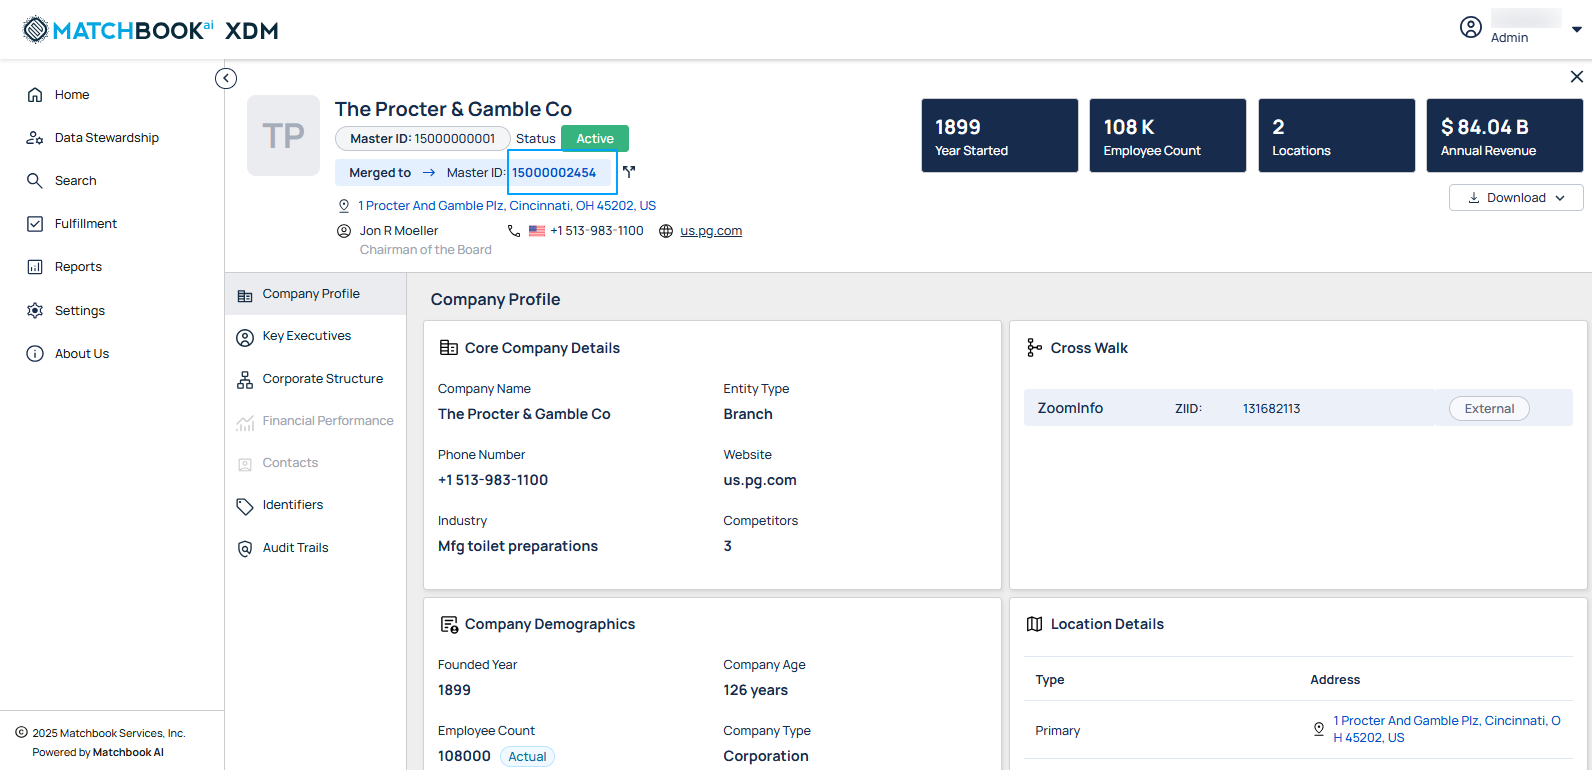
Click Unmerge as shown on the screen below.
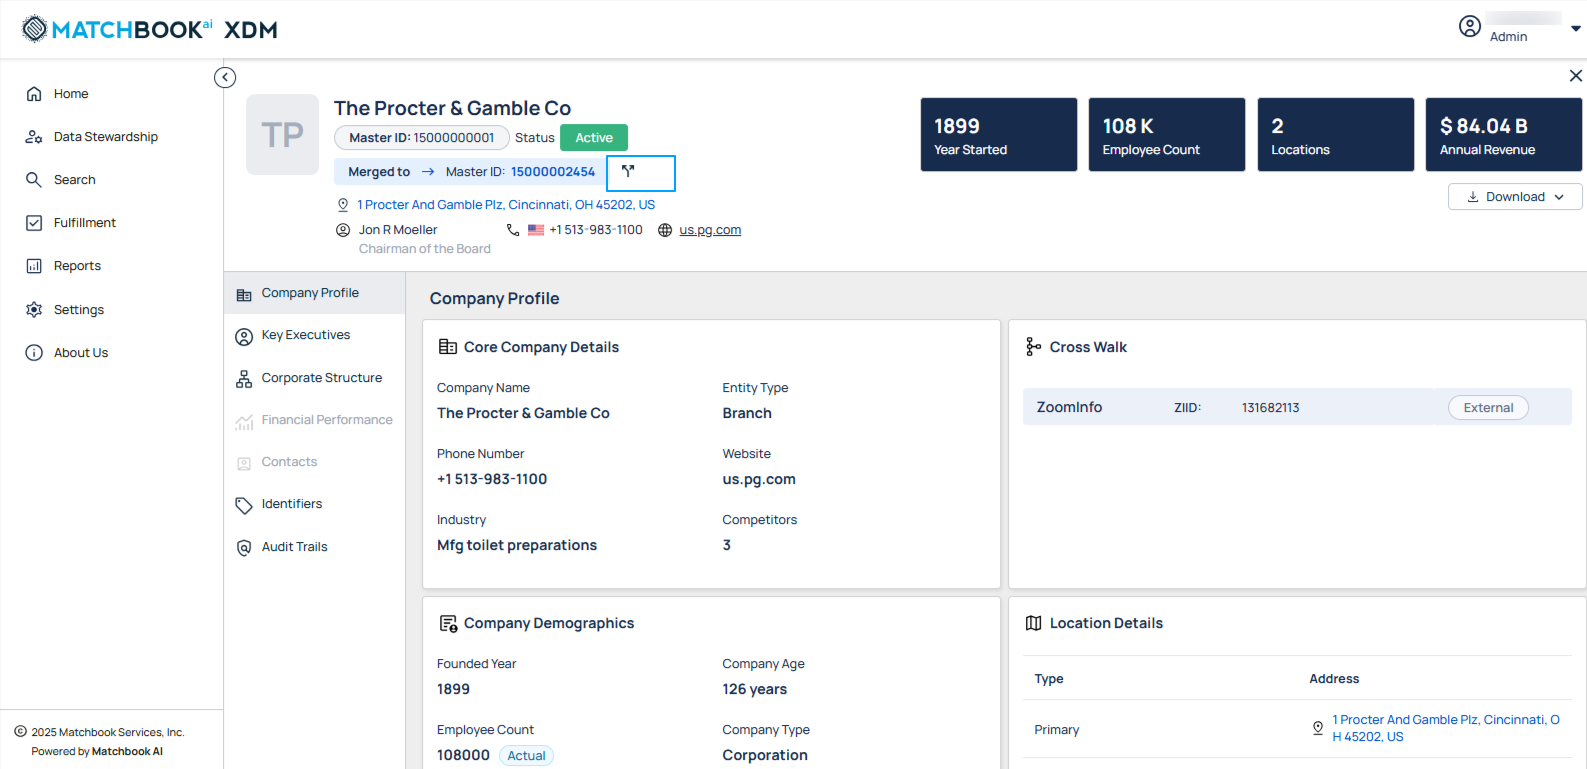
It opens a pop-up window titled Confirm Unmerge, saying
“You are about to unmerge this record from its master. Once confirmed, it will be removed from the master record and sent to the reviewer queue for validation and further processing.”
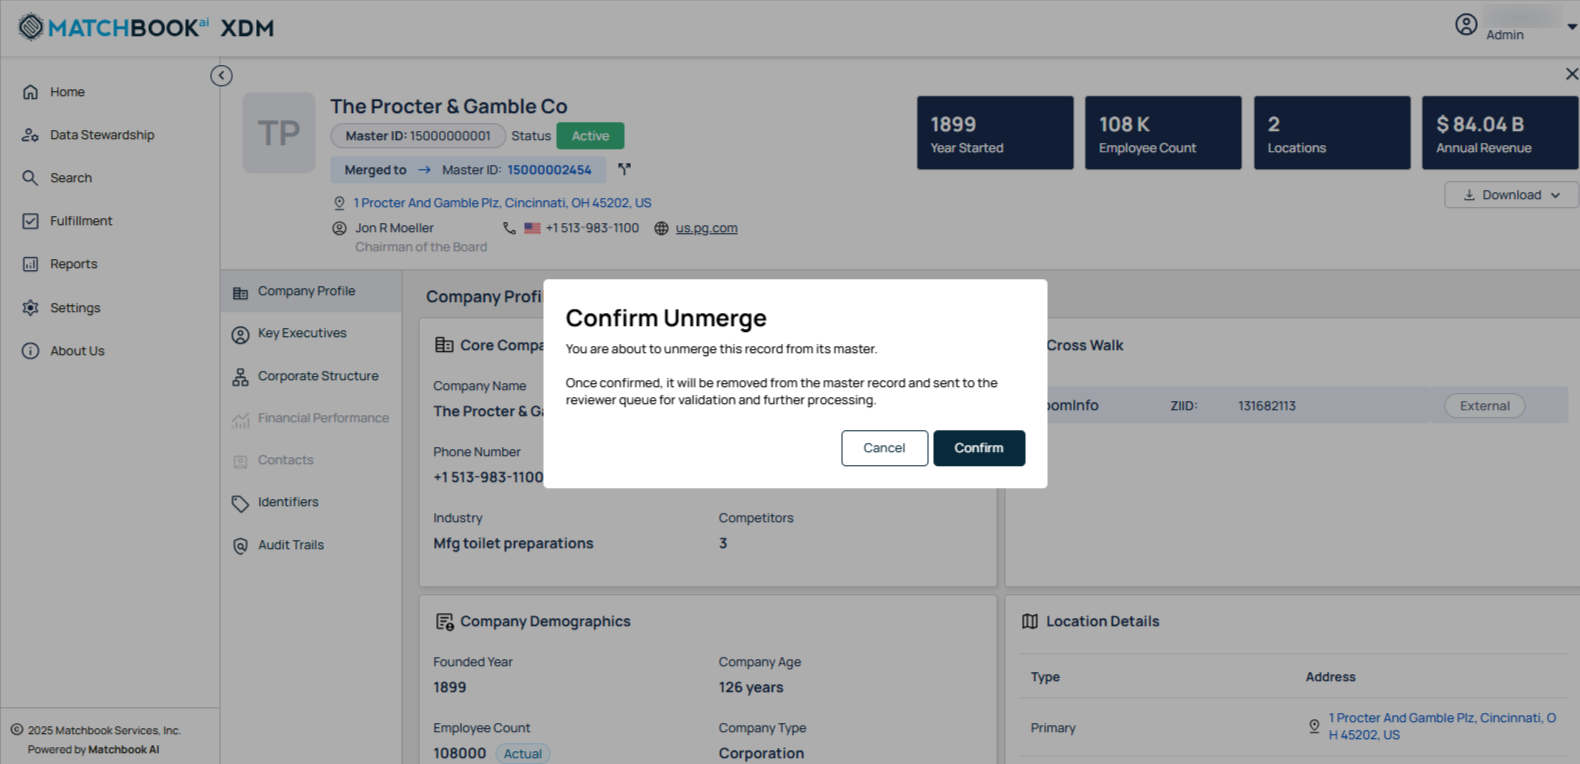
By clicking on Confirm button, the record is queued for unmerge and a toast message is shown: “The selected record has been queued for Unmerge”. The Unmerge button becomes disabled while the request is in queue.
2.3 Lock Records
Use case 1: When we search by Master ID, if a Node Record is being viewed by one user, it will be locked for other users, and the checkboxes for unique records under the Node Record will be greyed out. A warning message will be displayed to notify users: “Your search includes 1 record(s) currently being viewed by other users.”
Use case 2: If we search for records using filters like Company Name and State, the results will display with the message: “Your search returns 378 records. 20 records are currently locked and not displayed, as they’re being viewed by another user.” (With the company name and state selected, if there are 378 records, the first 20 records will be displayed based on the pagination settings. These 20 records will not be visible to other users).
However, if the user leaves the Data Stewardship page or logs out, the records will be unlocked, making them accessible to other users.